Install WordPress on IIS
August 20, 2017 Leave a comment
WordPress is a blog publishing application and content management system. According to wordpress.org, WordPress is “a state-of-the-art semantic personal publishing platform with a focus on aesthetics, Web standards, and usability.” The following sections describe how to install and configure WordPress for use with FastCGI on Internet Information Services 7 (IIS 7) and above. This document assumes that you have completed the setup and configuration of the FastCGI extension and PHP libraries.
Using FastCGI to Host PHP Applications on IIS 7
Enable FastCGI Support in IIS
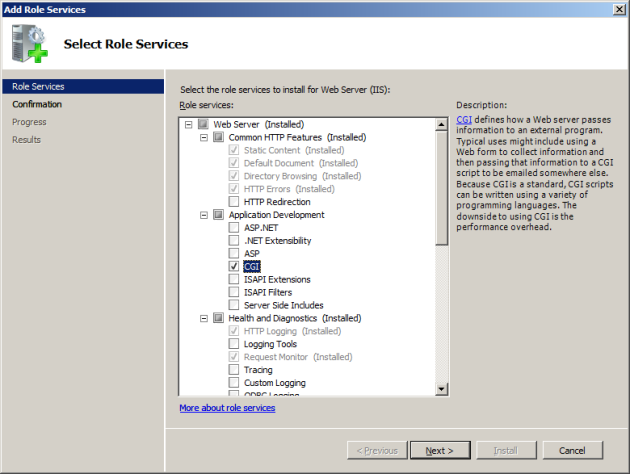
Windows Server 2008
Go to Server Manager -> Roles -> Add Role Services. On the Select Role Servicespage, select the CGI check box. This enables both the CGI and FastCGI services.
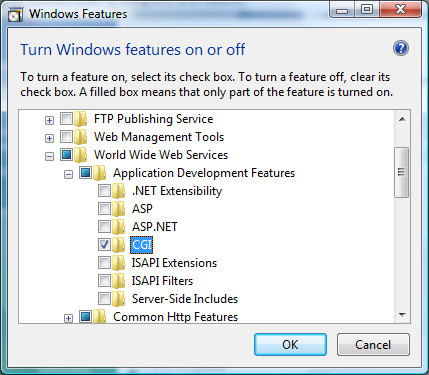
Windows Vista SP1
Go to Control Panel -> Programs and Features -> Turn Windows features on or off. In the Windows Features dialog box, select the CGI check box. This enables both the CGI and FastCGI services.
Install and Configure PHP
It is recommended that you use a non-thread safe build of PHP with IIS FastCGI. A non-thread safe build of PHP provides significant performance gains over the standard build by not doing any thread-safety checks, which are not necessary, since FastCGI ensures a single threaded execution environment.
To install PHP:
- Download the latest non-thread safe zip package with binaries of PHP:http://www.php.net/downloads.php.
- Unpack the files to the directory of your choice (e.g.C:\PHP). Rename the php.ini-recommended file to php.ini.
- Open the php.ini file. Uncomment and modify the settings as follows:
- Setimpersonate = 1. FastCGI under IIS supports the ability to impersonate security tokens of the calling client. This allows IIS to define the security context that the request runs under.
- Setfix_pathinfo=1. cgi.fix_pathinfo provides *real* PATH_INFO/PATH_TRANSLATED support for CGI. Previously, PHP behavior was to set PATH_TRANSLATED to SCRIPT_FILENAME, and to not define PATH_INFO. For more information about PATH_INFO, see the cgi specifications. Setting this value to 1 will cause PHP CGI to fix its paths to conform to the specifications.
- Setforce_redirect = 0.
- Setopen_basedir to point to the folder or network path where the content of the Web site(s) is located.
- Setextension_dir to point to the location where the PHP extensions are located. Typically, for PHP 5.2.X the value would be set as extension_dir = “./ext”
- Enable the required PHP extension by un-commenting the corresponding lines, for example:
extension=php_mssql.dll
extension=php_mysql.dll
- Open a command prompt, and run the following command to verify that PHP installed successfully:
consoleCopy
C:\PHP>php –info
If PHP installed correctly and all its dependencies are available on the machine, this command will output the current PHP configuration information.
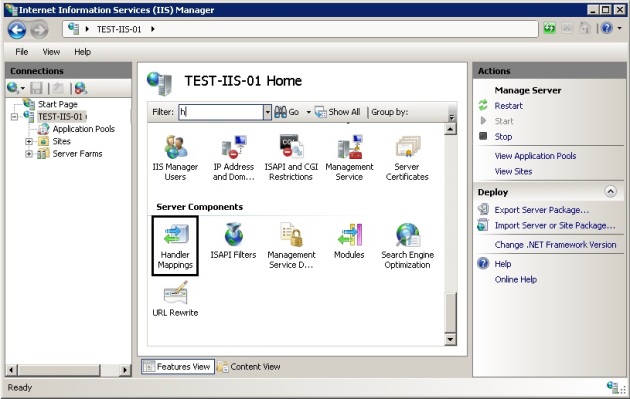
Configure IIS to Handle PHP Requests
For IIS to host PHP applications, you must add a handler mapping that tells IIS to pass all PHP-specific requests to the PHP application framework by using the FastCGI protocol.
Configure IIS to handle PHP requests by using IIS Manager
- Open IIS Manager. At the server level, double-click Handler Mappings.
- In the Actions pane, click Add Module Mapping…. In the Add Module Mapping dialog box, specify the configuration settings as follows:
- Request path: *.php
- Module: FastCgiModule
- Executable: “C:[Path to your PHP installation]\php-cgi.exe”
- Name: PHP via FastCGI
- Click OK.
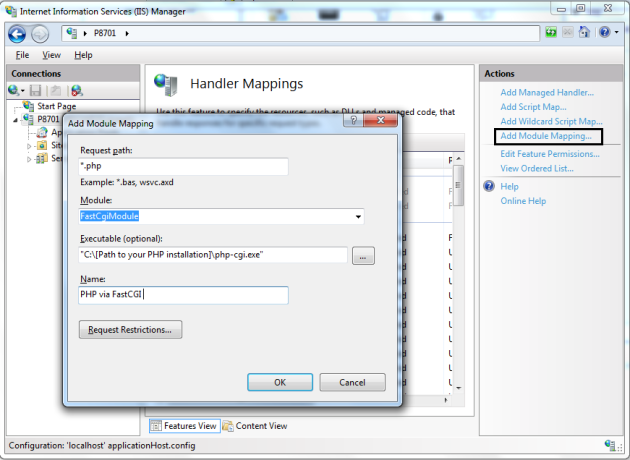
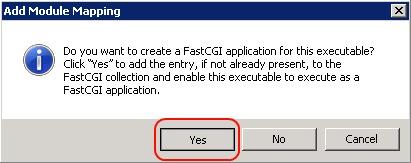
- In the Add Module Mapping confirmation dialog box that asks if you want to create a FastCGI application for this executable, click Yes.
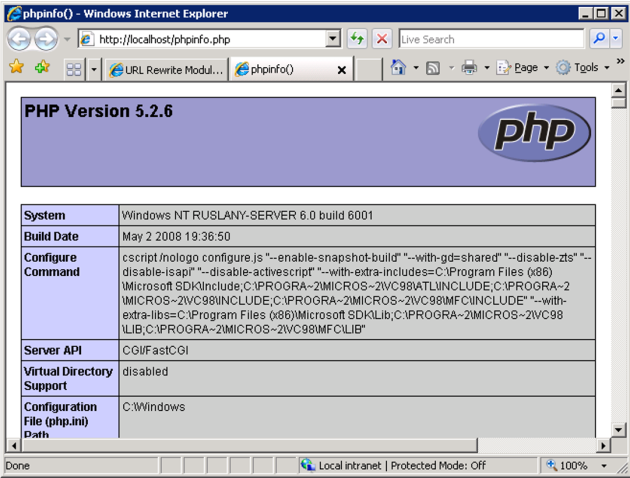
- Test that the handler mapping works correctly by creating a phpinfo.php file in theC:\inetpub\wwwroot folder that contains the following code:
<?php phpinfo(); ?>
- Open a browser and navigate to http://localhost/phpinfo.php. If everything was setup correctly, you will see the standard PHP information page.

Recent Comments